Sunday, November 11, 2012

I am your sunshine?

Mia nominated me for a "Sunshine" blog award. I am not really into these memes usually, but I really liked the questions she asked, so I answered them. But I am not going to nominate anyone else. The buck stops here! (But thanks, Mia, I had fun thinking about these. I'm trying to do "NaNoWriMo," but with a few short stories rather than a novel, and all writing exercises are helpful.)


The "rules:"(which I am breaking, since I'm not doing 4 or 5)
1. Include the award logo in a post and/or on your blog sidebar.
2. Link to the blogger who nominated you.3. Answer 10 questions about yourself.4. Nominate 10 other fabulous bloggers and ask them 10 questions.5. Link to your nominees in your post and let them know about the reward.

1. Are you left- or right-handed? (Or ambidextrous?)

I am right-handed but left-eye dominant, and I naturally stand on my left foot if called upon to stand on one foot. I figured out the eye thing the first time I shot a gun (it is not a regular occurrence , and I couldn't aim for crap because I was holding it on my right side and trying to use my left eye to aim. If I were to become a marksperson, I would start shooting left-handed.

2. What was the last thing you drew or doodled?

Since I'm a mathematician, I doodle all the time. Mostly I draw genus 2 surfaces. (I study surfaces of genus greater than or equal to 2, and apparently I'm a lazy doodler, so I just make two holes, even though the surfaces could have 800 holes, or seventy billion.) I've been drawing a lot of triangles, too, and I have some ideas for cool pants and dresses that I have been doodling. But most likely a genus  2 surface is my most recent doodle.

3. What’s the best present you ever received?

This was a toughie. I have a great family and awesome friends who really know me and find things that are perfect for me. My grandparents got me a sewing machine when I was in middle school, and obviously I've enjoyed that for over a decade now. I really like presents that are activities to do together. I think spending quality time with someone is really important for sustaining a relationship, whether romantic or not. Jon got me tickets to a Chicago symphony concert that I really wanted to go to last year (and that wasn't really up his alley), and I really enjoyed that. I've gotten tons of wonderful, really meaningful presents, but those are just two that come to mind as especially nice.

4. What’s the best present you ever gave?

Jon went to take a temporary job in France three weeks after we got married, and I made a book for him before he left called "Jon's Evelyn Book." It has pictures of me and us together. Every year for our anniversary, I make him another Jon's Evelyn Book, filled with pictures from the past year (or old ones I've dug up and think he'll like). 
5. What words do you have difficulty spelling no matter how many times you look them up?
I have always been a good speller, but mountain was a hard work for me for a long time. Occasion too. I know how to do it now, but it took me years. I am currently working on infinitesimal. I think it should have a double s, but I am wrong.
6. When you’re putting on shoes and socks, do you do sock-shoe-sock-shoe or sock-sock-shoe-shoe?
Hrm, I think I do sock-sock-shoe-shoe. Just yesterday I was thinking about how socks and shoes are a good example for understanding commuting and non-commuting. Commutative actions don't care what order you do them in, like putting on your left and right socks. It doesn't matter what order you put them on in. Non-commutative actions do care: putting on shoes first and then socks is not the same as putting on socks and shoes.

7. Did your parents make things up about the world when you were a kid? What’s the best/worst thing they told you? (My dad told me there was whale blubber in ice cream. I told everyone.)
I honestly don't remember. They probably tried to give me as much accurate information as possible, especially when it came to scientific facts about the world. They're boring that way. This isn't quite the same, but I do remember my dad trying to tell me about higher-dimensional space. (So like fourth dimension and beyond.) I insisted that he was being ridiculous and obviously the world was just three dimensions, so we couldn't even say anything about four-dimensional space or higher. Then he told me that there might be situations where there were more than three inputs in a problem, and (alert: this is my interpretation now of what he was probably trying to say then) the way you can think about modeling those inputs would be a graph in four or more dimensions. It made me think, but I stubbornly held my ground for that argument. I couldn't let him know I thought he might have a point. 

8. What’s your favorite punctuation mark?
The semicolon. Kurt Vonnegut, one of my favorite authors, didn't like it (something about a transvestite hermaphrodite; I don't have a problem with transvestite hermaphrodites, although I have never met any), but I think it's grand. It's a nice understated way to connect two ideas without having to decide between "and," "but," "because," or other conjunctions. I think that lets you have a little more creativity.

9. What’s your favorite single-use kitchen implement (or other single-use household implement, if you don’t spend much time in the kitchen)?
We try not to have too many unitaskers, but a pastry cutter is one. I don't use it a ton, but there's really nothing else that can help you incorporate solid fats into pastry dough as effectively. Cheese graters are good, too. And my tea maker. And when we move and have more room in our kitchen, we want to get one of those seltzer makers you sometimes see in Sky Mall catalogs.

10. What’s your favorite “unsolved event,” mysterious creature/person, or otherwise creepy weird thing that hasn’t been figured out by modern man? (I find the Dyatlov Pass incident fascinating.)
I recently learned about these things called "fairy circles"in Namibia. They are these circles where grass doesn't grow, but eventually (over the course of a few decades) the circles are revegetated. Scientists recently documented the whole life cycle of these circles, but various hypotheses about why they occur have been discredited. The hypotheses include fungi or other diseases, ants or termites, and natural gas deposits beneath the surface. I'm also curious about who poisoned Victor Yushchenko and who poisoned some tourists in Thailand. (The tourist story is very sad.)

Sunday, October 28, 2012

Easy wrap dress

I just noticed that I wrote this post back in May and never posted it! Now that it's starting to get cold here, seeing this is a nice reminder of what it's like to be warm when you're outside.

This is Vogue 8646, a "very easy Vogue" wrap dress. I made it out of an old bedsheet. When I unpacked our belongings after we moved to Chicago, I realized that we had several sheet sets that either didn't fit our current bed (Jon's old extra long twins from college) or were clearly inferior to other sheet sets and thus never got used, so they went into the sewing stash. Even though I have a ton of non-sheet fabric in my stash as well, using the old sheets is a low-stakes way to test out a pattern. Basically this is a nice wearable muslin that was free to make, and I plan on making a lot more bedsheet muslins.

For this one, I used a lightweight cotton-poly blend light green checked sheet. The pattern only had four pieces, and it was really easy to lay out. (The grid pattern of the fabric made it easy to line up the pattern pieces with the grainline.) I like what a full skirt it has, and I liked that the pattern had you do finishing a little bit at a time rather than getting to the end and having a million hems to make. For the armhole and neck/front opening, it had you do a single fold bias tape finish. I had never used this technique before, and the instructions were a little unclear, but I found a good tutorial on the Burda style blog. I did the single fold bias finish for the first time, and I was a bit underwhelmed. I guess it's a faster alternative to using facings because you don't have to cut the facing out, but I felt like it wasn't as good on the tight curves on the armhole. I was pretty happy with how it worked for the neckline. I might try omitting the seam allowance and doing a double fold bias tape finish next time, or making armhole facings and doing the single fold bias tape finish on the neckline. I made my own bias tape out of the same fabric. That was fun. I might post about that later.
I found the bodice a little too roomy, especially where I graded up a couple sizes for the waist. Next time, I will cut a smaller size and make it a straight size, even though my bust, waist, and hips are all different sizes. I will also use a snap instead of ribbons for the inside fastener. I think it is too hard to keep the ribbons from looking lumpy on the outside, and I'm not sure I see any benefit to them.

All in all, I really like this dress. It's a little translucent because I used a lightweight sheet, so I have to be careful with underwear color, but it's breezy and flattering on me. (With a smaller bodice it will be even more flattering.) I think the cut, especially the full skirt, is classic without looking vintage/costumey. (Not that there's anything wrong with looking vintage/costumey, but it's not always what I want.) I plan on making this dress again. I think all sorts of summery prints would look great in this pattern, and I bet I could make some nice fall/spring dresses by adding sleeves and using heavier materials.
I made this in late March or early April, but the first time I wore it was when I went to Houston for my graduation weekend. (Yes, you may call me Dr. Evelyn now.) I wore this on Friday, which was the day of the hooding ceremony, with my sea glass necklace. The necklace has the added bonus of holding down the flappy bodice a bit to help avoid wardrobe malfunctions. The hooding ceremony is an event for Ph.D. graduates so their families will get to sit through an extra boring ceremony on graduation weekend. It was actually pretty nice, and I was glad to have something lightweight but special to wear under my 100% polyester portable sweat lodge doctoral regalia.

Thursday, October 25, 2012

64th anniversary tablecloth II: practice


And now, the exciting conclusion of the tablecloth saga!

I should just say that this project was harder than I thought it would be. In theory, there's no difference between theory and practice. But in practice, there is. One lesson I learned was that the lumps and bumps of the human body are a lot more forgiving than a flat tabletop. Who knew?

My grandparents' anniversary was September 5, the day before my birthday. (I was a 35th anniversary present, a day late.) It's not really fall weather in Dallas, but my grandmother likes fall colors, and their house color scheme is fall-ish, so I went with some orange eyelet I had lying around and brown and cream polyester for the tablecloth. After some sketching, I decided that the color scheme, working in from the largest square, should be orange-white-brown-white-orange-white-brown-white.

When I left off the last post, I had just started cutting the fabric. I was a little worried about having enough of brown and orange, so I figured out a super clever strategy: the smaller squares covered up a lot of the larger ones, so I poached fabric from the larger squares to make the smaller ones of the same color. For the white ones, I cut the two larger squares out separately and then cut the 3rd largest out of the fourth largest.

I also figured out a super-clever way to cut a small square out of the center of a large square: fold the large square in half to get a double-layer isosceles right triangle. Then fold again to get a four-layer isosceles right triangle. Then, keeping measuring tape parallel with side of outer square, move it in until you hit the side length of the small square. (In the schematic on the left, I start with the full square and fold it up into the small triangle. The dotted line in the last triangle is the side of the smallest square.)

Unfortunately, I once again underestimated the difference between theory and practice. It's very hard to get all the layers perfectly flat, and some of the squares I ended up cutting out weren't very square. The large orange one worked out OK, but I had to re-cut some others out of the remaining fabric, which didn't end up being an issue. Oh well, it was a nice idea.

I also messed up the largest white square. I don't know how, but it ended up with sides that were two inches too small. I didn't have a square of fabric large enough any more, so I ended up cutting out four right triangles, the only part visible in each layer, instead of one square.
This is the orange piece with a square cut out of the middle. That white layer is the one I had to make by cutting out triangles instead of a square because I miscalculated the first time.

The construction was pretty straightforward. I started from the innermost square and worked my way out. Instead of doing some sort of turn-under on the sides of each square, I topstitched using a wide but short (many stitches per inch) zigzag stitch. A wide, short zigzag stitch can cover a multitude of sins! I was nervous about the (lack of) square-ness of the squares, and the wide stitch gave me enough wiggle room to make less than straight sides look straight. (If you'll recall from the last post, I had computed the side lengths to the nearest thousandth, and here I was using a quarter-inch wide zigzag stitch-ha!) For each layer, I chose the color that was not represented by the two adjoining squares.

I had some trouble getting the fabric to lie flat. I had to pin a lot more densely than usual, and I also basted the layers. (I'm lazy, and I don't usually baste when I'm sewing.) In the end, I didn't completely get it to lie flat, but it was pretty good.

I went to Dallas for a week in September to be with my mom when she had surgery, so I decided to deliver the tablecloth in person then. Of course, I procrastinated and was trying to finish it the night before I left. Of course, I ran out of orange thread because the zigzags were so thread-intensive, so I had to run to the fabric store the next morning to pick up more. I had time to finish all the zigzags, but I didn't have a chance to do some of the finishing.

The upside to my procrastination was that I got to use my mom's beautiful 1950s-era Singer sewing machine to finish it off. (We think it belonged to a grandmother/great-grandmother/great-aunt, but Mom can't remember exactly how it got passed down to her.) Before I had a machine of my own, I used this one, and now that I am more experienced, I have a better appreciation for what a great machine it is. I had to get her to help me remember how to thread it and insert the bobbin, but once I had it all set up, it was a dream. I don't know how to describe it exactly. It's just a smooth ride. Is there a certain car that's supposed to have a really smooth ride? A Porsche or something? I've never driven a Porsche (or whatever the canonical smooth ride car is), but if I had, I would compare using this machine to driving a Porsche. I love my machine, and it can do zigzags and buttonholes better than Mom's, which requires special attachments, but I wouldn't mind having a machine like hers for straight stitching someday.

Since I had a big hole in the back of the piece from my weird inner square cutting, I used a big piece of leftover white fabric to make a backing for the piece. Here it is before I covered the hole. (I didn't take a picture after. Oops.)

My mom sent me some pictures of the finished tablecloth on my grandparents' table, one of which is posted at the top of this post. I hope they like it. I love and admire them so much, and I hope that our marriage can be as long and as loving as theirs. I often have trouble finding good gifts for them, so I was glad to get to make them something special and creative.

Jon LOVES the design. He's supportive about my sewing, but he's not usually very effusive, and he doesn't often bring a design up later. I might be able to make a present for him along these lines, although I'll probably go smaller/fewer layers. Wrangling eight was a bit overwhelming.

Sunday, October 21, 2012

64th anniversary tablecloth I: theory

In my last post (two months ago!), I asked for ideas for a tablecloth that would feature 8 squares for my grandparents' 64th (8 sqared-th) anniversary. A twitter friend pointed me to Wooly Thoughts, a site with the tag line "in pursuit of crafty mathematics," and I ended up really liking this design. My version has 8 squares in it, of course. I used more math than I'm usually aware of using when I sew, and it was really fun. In this post, I'll talk about some of the math I used. In the next post, I'll talk about the actual construction of the tablecloth.

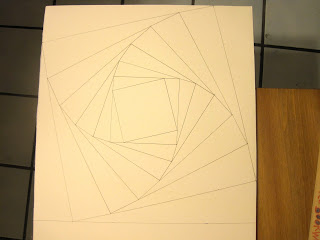
The mathematics behind the square pattern is a curve of pursuit, at least as I understand it. I haven't done the computations myself, but I think that the "spiral" (it's piecewise straight, but the mind easily makes it into a curved spiral) traced out by the corners of the squares represents the path four dogs (or mice) would take if they were all mutually chasing each other at constant speed. Pretty cool, huh? The way I thought of constructing it was just rotating a smaller square until its corners hit the sides of the next larger square.

I decided that I wanted a constant ratio of sizes of squares, and I thought that it would be cool if the innermost square were parallel with the outermost. I did a simple high school geometry proof to make sure that the angle of successive squares was additive.

The left picture is a schematic of a few of the squares. The right is a blow-up of the way the angles in question are situated. The variable x represents the amount of rotation at each layer. The variable y represents the total rotation after two layers. I used the fact that the sum of angles of a Euclidean triangle is 180 degrees and that vertical angles are congruent to conclude that y=2x, which means that rotation is additive. (OK, technically I showed that the rotation would be additive if the rotation is by the same amount each time, but if x were replaced with z for a different amount of rotation, we would find that y=x+z.)

There might be an easier way to see that rotation would be additive in this case. It's obvious that it is additive if the vertices of both angles x are in the same place, so if the squares all had a corner in common. But I was worried that maybe something weird would happen when you slid the second angle along the side of the first triangle. This proof told me that nothing weird would happen. I have learned that my intuition is often wrong in math, so it was nice to have a proof so I knew for sure.

Since 13x7=91, which is close to 90, I decided that each square should be rotated by about 13 degrees to get the sides of the last square to be parallel with the first. I wanted the tablecloth to have a diagonal length of 60 inches because my vision was for it to be rotated and put on their table diagonally, and based on their table size, I thought 60 inches was a good length.

I couldn't actually find our calculator. (Update: I found it recently when I accidentally knocked it off the back of the work desk. But the batteries are dead anyway.) Instead, I used the google as a calculator to figure out what the side length of the largest square should be to give diagonal length 60. (Answer: 60/sqrt(2), about 42.4 inches, conveniently about the same as the width of the orange fabric I was using.)
 Then I set up an equation to figure out the ratio between successive square side lengths. In the picture to the left, I assume the total side length of the largest square is 1 and figure out where the second square touches the first using the equation I wrote at the bottom. To figure out the side length of the smaller square, I used the Pythagorean theorem with the x and 1-x to get the hypotenuse of that triangle, which is the side length of the second square. After getting a decimal approximation of that side length, I computed all the square side lengths to three significant figures. That should have been my first clue that I was greatly underestimating the difference between theory and practice: my tape measure goes down to 16ths of an inch, and my cutting is considerably less accurate than my tape measure.

Here is a sketch of my plan on poster board.

Even with the relatively good precision of pencil and paper, the innermost square didn't line up very well with the outermost square. But it looked cool anyway.

Unfettered by banal practicalities such as the realistic amount of precision I could hope for when cutting the fabric, I double-checked my numbers and went off to cut the fabric.

Tune in tomorrow (or whenever I get around to posting again) to read about the differences between theory and practice that I encountered during this project! (Compelling cliffhanger, or most compelling cliffhanger?)

Sunday, August 19, 2012

Brainstorming

My grandparents' 64th wedding anniversary is coming up in early September. It's the day before my birthday, so it's easy to remember. 64 is 8 squared, so I'm trying to think of a sewing project I could make for them that would feature eight squares. I'm not a quilter, so I don't want to try a quilt or bedspread, and I'm not a proficient enough crocheter to make a big crochet project.
Here are some of my ideas:
A tablecloth that would have a design with rows of 3, 2, and 3 squares. (So each of the squares in the 2 square row would have side length 1.5 times those in the 3 square rows.) I think that would be more visually interesting than 4 rows of 2.
Related: A table runner made of eight squares.
Eight napkins or placemats (napkins are more prone to being square, so if I made placemats, they might be mistaken for napkins).

Any other ideas for something interesting with eight squares?

Saturday, August 18, 2012

Bag fix

After writing that last post, it got stuck in my mind that my friend is bringing new life into this world, and I was going to give her a sub-optimal bag because I was too lazy to take half an hour to correct a mistake. That seemed pathetic, so I fixed it. I like it a lot better now. I think she'll like it too.

My First Friday Night Sew In


My friend Katherine has been participating in the Friday Night Sew In (hosted this month by Crafty Vegas Mom) for a while, but it always seems to be on a Friday I have other plans. This month, I was finally able to do it. It was great because I just got back from my summer fellowship at Scientific American (link goes to a fun blog post that I wrote) in New York. I didn't take my sewing with me there, so it was a great way to jump back in.

This was supposed to be a birthday gift for one of my friends last year. We met at Baylor University, and that is the Baylor logo. Well, her birthday was in November, so then it was going to be a Christmas gift. As you can see, it is now August. But today is her baby shower (sadly, I can't be there), so it's now a baby shower gift. I'm also going to get her some reusable diapers to put in it. Last night I got this far. The bag has been sewed up and turned right-side out, but the straps weren't done yet.

And today I finished it up. It's the same tote bag pattern I've used several times, once again made to be nominally reversible. (I say nominally because the logo is backwards on the inside, so it's unlikely someone would actually reverse it.) It has a little carrying pouch that you can kind of see in the top picture hanging off the right side of the bag.
The slightly tricky part was the logo. I printed out a copy of the Baylor logo and used that as a stencil. I cut out the large outlines of the B and U. Then I pinned an extra piece of yellow fabric to the cutout (the yellow fabric is only bright yellow on one side, so I couldn't just use the lining as the part that would show through). I sewed the bag up as normal, and after turning, I outlined the letters in a zigzag stitch. Then I cut out two green pieces to be the holes of the B. I would have left it, but it kind of looked like BJ, and I didn't want my friend walking around with a baby and a bj bag. To make the part of the U behind the B, I just kind of freehand cut out the top from one of the green pieces I was sewing in. It ended up looking pretty good, if I do say so myself.

Next time, I would probably hook the straps up differently. This is the way the pattern has me do it, but the logo would be less distorted, and the bag would probably lie flatter against the body when in use, if the straps were hooked front-to-front and back-to-back rather than front-back, front-back, if that makes sense. Part of me wants to redo it, but it's kind of a pain to take all the stitching out.

My sewing machine was being kind of weird. I can't figure out what the problem is. My lines of stitching are looking fine on the front, but a lot of them look like this on the back:
A mix of regular stitching and then some waviness. I have played with the tension, speed of stitching, pulling the material more and less, and I can't quite figure out how to fix it. It's not as bad with more layers of fabric, I think, and shorter stitch size seems better, although it might just be harder to see. I might need to take my machine in for servicing. Anyone know what might cause this type of pattern? It's somewhat regular, but not entirely.

Yay for FNSI! I am going to try to set aside an evening a week at least to work on sewing. It was a manageable chunk of time that didn't make me feel like I had to get to any particular endpoint. The nice dinner and wine we had before I started didn't hurt, either.

Wednesday, May 16, 2012

Refashioned wrap skirt

 
This is another project from the refashioning stack in the sewing room. I picked up this skirt from a garage sale or thrift store or something ages ago because I liked the fabric (nice drapey rayon) and print, but it has always been too large. It had an elastic waistband in the back and buttons down the front. It kind of  stayed up on my hips when I first got it, but the elastic stretched over time to the point that it was just falling off.

I was going to make some front and back darts to shrink the waistband to the appropriate size, and I decided to take the elastic out of the back waistband to keep the darts smooth. After removing the elastic, I ironed in some interfacing to stabilize and stiffen the waistband a little.
When I was trying on the skirt to see how much material I needed to remove to get the waist the right size, I realized that it might work as a wrap skirt. There was about an eight inch overlap at the front. I really liked the way it looked, so I decided to go with that. I chose to put the side with the buttonholes under and the side with the buttons over, so there's a nice column of buttons going down the left front of the skirt. In the end, after I had placed all the buttons and snaps, the waistband seemed to have relaxed a little more, so I added two small pleats in the back of the skirt to get it the right size again.
 
I added a button to the waistband on the left side and snaps under the first five buttons on the right to close the skirt. It took me a few tries to get the snaps lined up just right. Then I poached a little material from the facing on the left panel (the "under" panel) to repair a hole on the button placket, and I was good to go.
 

I'm really pleased with this refashion. I've been wanting to wear this skirt for so long, and now I can. I think this can be dressed up or down, and it's nice and breezy for summer, but I could easily layer underneath it in the winter. It might be a little frumpy looking, but maxi skirts are in right now, so I think that makes up for it. (I don't really care that much, either, if I like how I look.)
For the first public outing, I chose to be a bold pattern mixer. I'm not too shy about pattern mixing, but I tend to stay in the same color family. This time, I decided to let the flowers be the unifying element. I've never done anything like it but felt confident and fun all day. I don't know what people thought of it, but Jon liked it, and I felt good, so that was that.
In other news, my hair has jumped the shark. (The shark is my waist?) I almost never wear it down, and I often wear braids that shorten it significantly, so I don't think I realized how long it has gotten until I looked at these pictures. Wow! I'm not sure what I want to do with it. I keep thinking about cutting my hair very short again like I did in 2000 and 2007, but I like all the cool braided styles I can do with long hair. But on the other hand, I also like making big changes, and a short hairstyle would be a nice big change. But on the other other hand, I think long hair is lower-maintenance on me than short hair is. Most likely, inertia will win out, and I'll keep it rolling, possibly with a little trim to get rid of the split ends. I'm curious how long it will get.

Monday, May 14, 2012

Sea glass necklace

 Jon and I have been collecting sea glass for a few years now, and I've been wanting to make something fun with some of our pieces. When I saw this tutorial for small glass bottle necklaces, I thought it would be ideal. I found a few little glass bottles at a garage sale a few weeks ago, and last week I finally went to Michael's for the jewelry making supplies I needed. I used a serrated kitchen knife and an Exacto knife to cut a wine cork into the right size for the top of the bottle.
 

I'm very pleased with the final result. The cork is snug and doesn't seem in danger of falling out, and I think the glass pieces settled nicely so the colors are well-distributed and the two most special pieces (cobalt blue and light turquoise) are easy to see from the outside. The colors are very calming, and the fact that it's filled with sea glass from Lake Michigan (I should call it beach glass, since Lake Michigan isn't a sea) makes me think of both Chicago, where I found it and where I love living, and Jon, the person who found it with me and with whom I have enjoyed many hours of sea glassing. I think it will get a lot of wear.


Sunday, April 15, 2012

Easter dress

I made this dress a couple weeks ago right after a really warm spell in March. I was raring to make something light and cool, and then of course it got a lot cooler right after I made it. I ended up wearing it with tights and a jacket for Easter because it's so bright and flowery. (I ditched the jacket for the photo shoot, and it wasn't too bad. I'm just very Texan and prefer to be warm at all times.)
I used the same vintage pattern as the jet lag dress from a couple years ago. I bought the fabric at the same time as the green fabric for that dress, which I intended to be a wearable muslin for this fabric, but then I was concerned that the pattern looked too distinctive and costumey to have two of. But a couple weeks ago I decided I really wanted to make a dress out of this fabric, and it was the only pattern I thought would be nice and for which I had enough fabric, so I decided to go for it.
I thought the print really changed how the dress looked, so even though it's obviously the same pattern, it doesn't make me feel like I'm wearing a costume. It's amazing what a print can do. (Side note: I had a dickens of a time figuring out which way was "up" on the print. I could tell that there was no 180 degree rotational or reflective symmetry, but which one was right-side up was not clear to me. I settled on this in the end, and at least it's not clearly wrong. Maybe it could go either way.) I incorporated my ideas from that post for getting the fit a little better, and it wasn't as tight just below the waist. I also did a good job of keeping the fabric, which has a horizontal stretch, from being distorted as I sewed. Good use of staystitching and making sure the feed was smooth were the two main factors. Go me!
The one thing I'm not really pleased about is the placement of the pattern on the front.
I wasn't planning on trying to match the pattern for a variety of reasons: I didn't have much excess fabric and the center front isn't on the straight grain, plus I'm too lazy for that kind of thing. So I knew the pattern wouldn't match up, and I didn't care about that, but I felt like on the front it's close enough to matching that it's awkward.
And the fact that the center front isn't on the grainline means that the distance between the repeat gets larger from top to bottom.
This isn't as obvious when I see pictures of myself wearing it as when I look at it up close or in the mirror, but all in all, I'd prefer for the pattern placement to look more arbitrary. It's not a big enough deal to keep me from enjoying the dress, of course!
I felt great in this dress for Easter, and I think it'll be nice for the summer, too. The fabric is really breezy, and I think the pattern will help hide the inevitable sweat stains I'll get if I wear it on a warm day. (I'm a sweaty lady.) I don't know if it'll be a good biking dress. I think the skirt might be just a little too apt to float up a bit, not enough to be truly scandalous, but enough that I might feel uncomfortable without tights. I haven't taken it for enough of a test ride yet to see.

Yay new dress! I made another new dress that week that should make its blog premier soon. It's just been too cool since I made it to get good outdoor photos. Come on, warm front!

Friday, April 13, 2012

Fashion risks

OK, this post is really just about the conflict between creativity/expression and the desire to fit in, not about any new sewing projects. Since it is a handmade dress, though, I decided it can go on the blog.

I'm going to the symphony later today, and I decided to try on my outfit this morning. It's a matinee performance, so I didn't want to look too formal. I've worn this red (perfect) dress with these gold tights and Frank Lloyd Wright glass design scarf before, but with the scarf tied in a knot in front. The scarf has some gold in it that matches the tights, so I was playing around with getting the gold to stand out more, and I ended up with this vest-like arrangement of my scarf. I let it hang down like a stole and then belted it with a tie I had removed from a skirt a long time ago.
I really like that you can see the design on the scarf better than when it's tied up normally, but it's a very unusual look, and I'm nervous about wearing it. I'm thinking about swapping out the tights for black ones so the only out-there part of the outfit is the way I'm wearing the scarf. I like the way the gold appears in both the scarf and the tights, but I think I'll feel more comfortable in something a little more toned-down. If I had black tights with an open weave design of some kind, maybe that would help tone down the color but still give that outfit harmony with the gold. Alas, my only patterned tights are blue.
Jon thought this outfit was really cool and was very supportive of me being creative with it. I'll have to ask the friend who's going with me to the symphony what he thinks. Interestingly enough, just last week the two of us were talking about how we've both had changes of heart in thinking about how we dress. We went to high school together (he was my prom date), and at that time we were both fairly uninterested in how we dressed and kind of felt like it was stupid to care how you looked. We've both come to different feelings about it recently, seeing it as an important way of presenting yourself to the world. It's interesting how people change.

Thursday, April 5, 2012

Refashioned shorts

I've had these floral print ankle-length pants for a long time, and they just never worked. The length was wrong, and I was never happy with the way the pockets gaped. I kept thinking I just needed to figure out how to rock them, but after years and years, I gave up on them and they went in the sewing room refashion/alteration pile. This pile is surprisingly hard to tackle. You'd think that alterations and refashions should be easier than new garments, but there's something about the clean slate that makes new things easier for me.

Last week, I finally tackled the refashion/alteration pile, and this is the first thing I worked on. After looking at myself in the mirror with the pants on, I decided that the length and pocket gaping were the only two problems. The fit through the hips and legs was good, so I just had to decide what length to make them. I'm very fond of knee- and just above-knee shorts, so I decided to add another pair to my wardrobe. I hacked 14 inches off the legs and made a narrow hem at the bottom. I thought about cuffs but took the easy way out.

Then I made the painful decision to sew up the front pockets. The pocket gaping has always bothered me on these pants, and with the pockets shut, they are nice and smooth over my hips. I am a big fan of pockets, but I think the unattractive gaping would be a deterrent to wearing the shorts. Of course, it will be easy to reopen them if I change my mind.
I wore these out for the first time on Tuesday. It may have been slightly chilly for shorts, but I really liked how I looked! I think these will be a great way to make summer shorts outfits look a little classier, especially for bike dates. I just wish I had done it sooner. There are a few small stains on some of the white parts, so I'm thinking about dyeing them cobalt blue. We'll see if I ever get around to it. In the meantime, they're quite nice as-is.