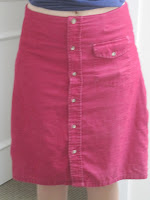
This is a skirt I made out of one of Jon's old shirts. The sleeves were kind of worn, and it was too big for him, so I got his permission to refashion it. I have another one in progress that I kind of got stalled out on months ago, so hopefully it will grace the pages of this blog soon. I really like this skirt. It's a nice casual but kind of funky garment. I like that a lot of the details were already done for me: buttons, a hem, and a cute front pocket.
I made it well before I even considered having a sewing blog, so I didn't take step-by-step pictures of how to make it, but here's an outline of what I did.
1) Cut off neck/shoulder yoke area of button-down shirt. Cut off sleeves. (I was hoping to use the sleeves as pockets, but it was just too lumpy) Sew side seems down the two sides, following the curve of your body. You might have to take out some of the bottom hem and re-sew it after you do the side seam.
2) Add darts at the top. If you have a small waist-to-hip ratio, darts are quite helpful in getting skirts to fit right. To make darts, figure out how much of a decrease you need at the top, divide by four, and pinch that amount out in four places around the waistline. I made my darts about 2 1/2 inches long. It's not difficult, but it took me a couple tries to get them to look good.
3) Make the waist facing. You have some fabric lying around because you cut the sleeves and shoulder part off. The shoulder/neck area is probably the best place to find your facing. What you want is a strip of fabric (it might be in a few pieces) about 2 inches wide and as long as the top of the skirt. With right sides together, sew this strip to the top of the skirt with about a 5/8-inch seam allowance. Clip curves, fold facing to inside, and press. Topstitch close to the top of the skirt. This will help the facing stay folded down.
I had to do a little futzing with the facing near the buttonhole. I didn't feel like being very "correct" about it, so this is what the inside of the fabric looks like. (The zigzag stitching was my way of making sure the facing wouldn't fray.)
4) Try it on. You should be doing this as you go along anyway. Here is what the skirt looked like for me at that point.
I wore it a few times like that, and I liked it, but I finally had to make a few changes. The top buttonhole had gotten a little distorted in the lining futzing stage, so the top button kept coming out. That was no good, so I got a larger button in a similar pattern and replaced it. Also, I was having gaping problems with the top few buttons, so I added snaps between them. I feel much more secure now.
I hope to be posting another skirt shirt sometime soon. I still have most of the sleeves of this shirt. I have been using this fabric for the cheeks of the bumblebee baby bibs from the last post. I think the pig ears were made out of this too.


No comments:
Post a Comment