Wednesday, November 24, 2010

Yellow shirt skirt

This is a little different from yesterday's shirt skirt because it's made from a t-shirt instead of a button-down shirt. It's much more casual, and I like to wear it to fun events like Houston's Art Car Parade. (That's where the above picture was taken.) I made this out of a t-shirt Jon had from college that said "Drop your pants BBQ." (Oh, college!) This is the first incarnation of the skirt.
As appealing as it was to have a bright yellow skirt that said "pants BBQ," I needed to figure out how to cover that up. I decided to use the sleeves to make a front pocket.
Much better. Once again, I made this long before I had a blog, but here's the general idea of how to make this. Aside from the shirt, you'll need some elastic that is as long as your waist measurement. I think 3/4" or 1" elastic would be a good size. I don't remember what size I used.

1) If you want a front pouch like mine, carefully remove the sleeves and set aside. Cut the neck off of the shirt from the top of one side of the sleeves to the top of the other.

2) Decide how long you want the skirt to be. Add about 2 inches. Measure that distance from the bottom of the shirt and cut the shirt off at the top. Sew side seams, following the curve of your body. The waist should be a little loose. You will be adding an elastic waistband.

3) Make casing for elastic. To do this, fold over 1 1/2" at the top and sew it down on the inside, leaving a 2" opening to insert the elastic. Make sure the casing is wide enough to accommodate the elastic comfortably.

4) Cut the elastic to your waist measurement plus three inches. Stick a safety pin through one end and use it to guide the elastic into the casing. When you've gotten it all the way around, overlap the elastic and sew it together. Then sew the opening of the casing shut.

5) Now is the time to add the pouch, if you want one. Sew the larger ends of the two sleeves together. Position pouch on skirt as desired. Sew top and bottom edges to skirt, taking care not to sew into the elastic.

This is just an outline, and if you don't have experience sewing, you might want to ask someone for help because I don't know if all the steps are completely clear.

Monday, November 22, 2010

Pink shirt skirt

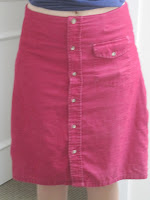
This is a skirt I made out of one of Jon's old shirts. The sleeves were kind of worn, and it was too big for him, so I got his permission to refashion it. I have another one in progress that I kind of got stalled out on months ago, so hopefully it will grace the pages of this blog soon. I really like this skirt. It's a nice casual but kind of funky garment. I like that a lot of the details were already done for me: buttons, a hem, and a cute front pocket.

I made it well before I even considered having a sewing blog, so I didn't take step-by-step pictures of how to make it, but here's an outline of what I did.

1) Cut off neck/shoulder yoke area of button-down shirt. Cut off sleeves. (I was hoping to use the sleeves as pockets, but it was just too lumpy) Sew side seems down the two sides, following the curve of your body. You might have to take out some of the bottom hem and re-sew it after you do the side seam.

2) Add darts at the top. If you have a small waist-to-hip ratio, darts are quite helpful in getting skirts to fit right. To make darts, figure out how much of a decrease you need at the top, divide by four, and pinch that amount out in four places around the waistline. I made my darts about 2 1/2 inches long. It's not difficult, but it took me a couple tries to get them to look good.

3) Make the waist facing. You have some fabric lying around because you cut the sleeves and shoulder part off. The shoulder/neck area is probably the best place to find your facing. What you want is a strip of fabric (it might be in a few pieces) about 2 inches wide and as long as the top of the skirt. With right sides together, sew this strip to the top of the skirt with about a 5/8-inch seam allowance. Clip curves, fold facing to inside, and press. Topstitch close to the top of the skirt. This will help the facing stay folded down.
I had to do a little futzing with the facing near the buttonhole. I didn't feel like being very "correct" about it, so this is what the inside of the fabric looks like. (The zigzag stitching was my way of making sure the facing wouldn't fray.)
4) Try it on. You should be doing this as you go along anyway. Here is what the skirt looked like for me at that point.
I wore it a few times like that, and I liked it, but I finally had to make a few changes. The top buttonhole had gotten a little distorted in the lining futzing stage, so the top button kept coming out. That was no good, so I got a larger button in a similar pattern and replaced it. Also, I was having gaping problems with the top few buttons, so I added snaps between them. I feel much more secure now.
I hope to be posting another skirt shirt sometime soon. I still have most of the sleeves of this shirt. I have been using this fabric for the cheeks of the bumblebee baby bibs from the last post. I think the pig ears were made out of this too.

Thursday, November 4, 2010

Bibs!

I have hit the age where all my friends are having kids. I wanted something practical but personal to give to my expecting friends, and I came upon Simplicity pattern 2468. It has several animal-themed bib ideas and patterns. There are three basic shapes that can be made into the animals they suggest, or you can get creative with them. They take a bit of time to make for how small they are, but I think that's to be expected becase they have a lot of little details. I think they are super-cute. After I made the first batch, I was trying to figure out a reason to keep them for myself, but they really don't coordinate with any of my outfits.

I gave the first set to friends in May, and I've three more sets in the past couple months because I have three friends due in November and December. I made five for the first family: a bear, a turtle, an alligator, a plain one with aliens on it, and the one I thought might kind of look like a fish. It turned out pretty weird, but I thought it would still be useful as a bib, so I gave it to them anyway. Here is the first batch.
I think the bear and turtle ones are the cutest, but the alien print is pretty great, too.

The next set I made were teddy bear, turtle, blue flowers, monkey on surfboard print, and one that I was trying to make look like a pig, but it kind of looks generically mammal. I get hints of dog. The monkey surfboard print is a remnant I bought at JoAnn's ages ago, and then when we went to have our friend's shower, we couldn't decide between a monkey theme or a beach theme, so we went with both, and the bib fit perfectly with that. Funny how that can happen.
The next two sets were pretty similar. I made the bee for the first time, and I thought it ended up really cute. Here are the other sets of bibs.
I really love making these bibs for people. I have bought some fabric for them, but mostly I am using leftovers from other things I've made. The turtle body and teddy bear ears are from aprons I've made for friends. The pig ears and bee cheeks are from an old shirt of Jon's that I've made into a skirt (more on that later). The blue flower print is from one of my perfect dresses. Most of the buttons are from my and my mom's button stashes. I've probably spent more on ribbon than on fabric for these crafts. If you are having a kid soon, there's a good chance you'll be getting a few of these. I hope you like them.